Synergy Wholesale

How to use Acronis Backup on VPS services

This guide will cover how to use Acronis Backup with your Self Managed VPS service through WHM and completing a restore from an available backup. If you are on a Fully Managed VPS service, please refer to our guides below on how to use Acronis Backup with your service:

What VPS Services include Acronis Backup?

Acronis Backup is included with all Fully Managed VPS services. If you are on a Self Managed VPS service, you can add Acronis Backup as an add-on to your service. For more information on adding Acronis Backup to your Self Managed VPS, please see our guide here.

How to perform a restore from Acronis Backup

Acronis on Self Managed VPS services takes incremental backups every 6 hours, with backups retained for 30 days. You can restore your entire server, or individual files, databases or mailboxes through the Acronis cPanel or WHM plugin. No separate login is required. To access Acronis and perform a restore, follow these steps:
  1. Log in to WHM on your VPS.
  2. In the left hand search bar, type "Acronis" and click on the "Acronis Backup" option that appears. WHM Acronis Plugin
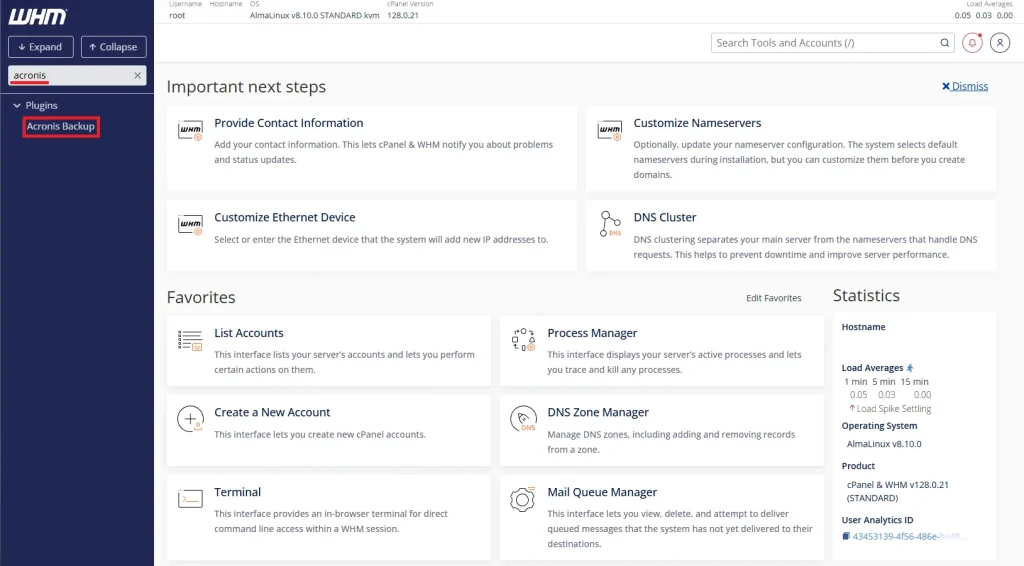
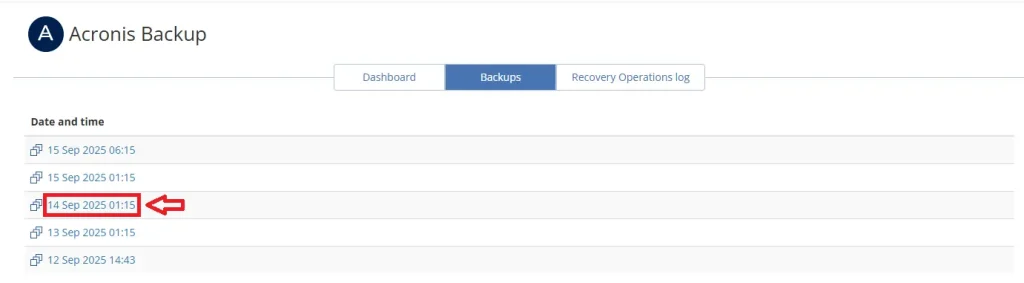
  3. This will open the Acronis Backup interface with a list of backup points that are available.
  4. Click on the backup point you would like to restore from WHM Acronis Restore Points
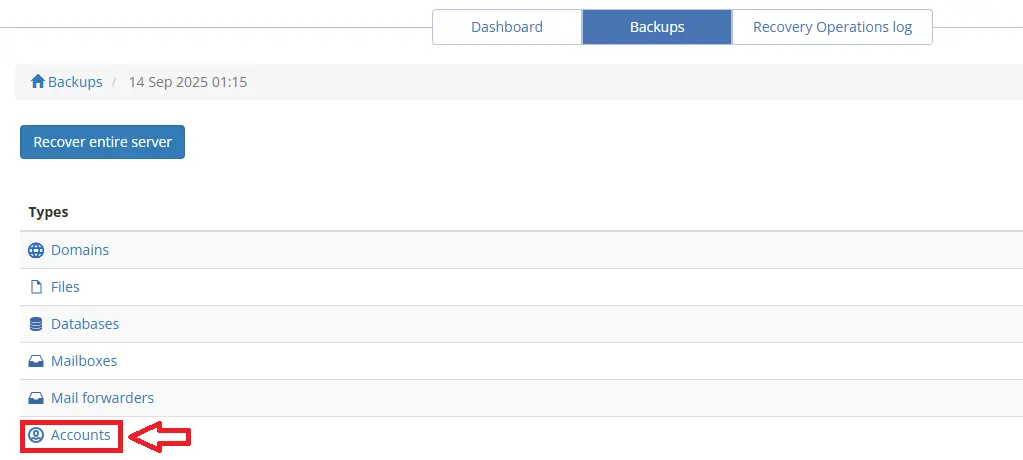
  5. From here you will be presented with a list of restore types:
      • Domains: Restore the document root of a domain.
      • Files: Browse and restore individual files.
      • Databases: Browse and restore databases.
      • Mailboxes: Restore cPanel Mailboxes.
      • Mailbox Forwarders: Restore any accounts forwarders.
      • Accounts: Restore entire cPanel accounts.
    We will cover restoring an entire account in this example, but the process is similar for all restore types. WHM Acronis Restore Types
  6. Click on "Accounts" and then select the account you would like to restore. WHM Acronis Account Selection
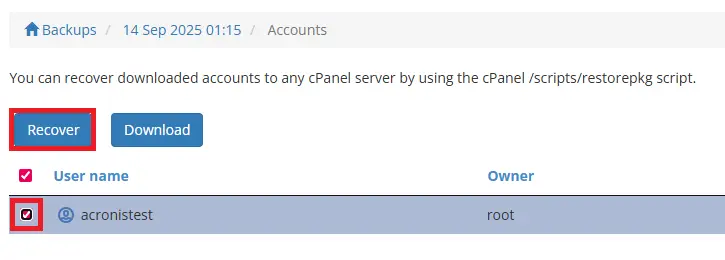
  7. Click on "Recover" and on the next screen, we recommend clicking the checkbox "Overwrite the Existing Account" Acronis Recovery Options
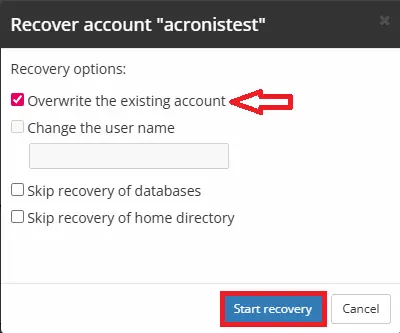
  8. Click on "Start recovery" to begin the restore
  9. You will now see an "in progress" banner at the top. To monitor the restore, click on "Recovery Operations log" WHM Acronis Restore in progress
  10. Once the restore is complete, you will see a green "Completed" status in the log. WHM Acronis Restore Complete
  11. You can now log in to the cPanel account that was restored to verify that the files, databases or mailboxes have been restored.

Full Server Restore

Acronis Backup on Self Managed VPS services do support full server restores; however, we do not recommend this, as usually not needed for 95% of restores. If your server has had a catastrophic issue that requires a full server recovery, you can log in to WHM and select a backup as shown above, but click the “Recover entire server” option. Once you confirm the details are correct, select “Start Recovery” This process will restart your VPS for Acronis to block level restore the server’s disk back to the restore point. Depending on disk size, this can take a few hours.

Need assistance?

If you have any additional questions or queries about this, we recommend submitting a support request through your Synergy Wholesale account, as our support team will be happy to answer any questions you may have.

Related Articles

WHM··4 minute read

This guide will go over creating and managing account packages in WHM. This does require you to be logged into WHM.

WHM··2 minute read

This guide will go over how to log in to WHM (Web Host Manager) and provide some tips for first-time users. Accessing WHM To access WHM, the easiest way is through your Synergy Wholesale account: Log in to your Synergy Wholesale account.

WHM··3 minute read

This guide will go over navigation within WHM (Web Host Manager) and some of its features. This requires you to log in to WHM. If you haven't logged in yet, please refer to our WHM Logging In guide first.

WHM··3 minute read

This guide will go over our recommended initial configuration steps after logging in to WHM, If you haven't logged in yet, please refer to our Accessing WHM guide first. Initial Configuration Steps We recommend going through the following initial configuration steps to ensure your WHM/cPanel server is set up correctly: Hostname Note: This step is only required for Self Managed VPS users, as our Fully Managed VPS users will have this set up for you.

WHM··2 minute read

This guide will go over creating and managing cPanel accounts within WHM. If you haven't logged in yet, please refer to our Accessing WHM guide first.

VPS Addons··1 minute read

What addons are available for my VPS? Self Managed VPS Plans The following addons are available for Self-Managed VPS services that do not already have these installed: Complete Security Suite which includes: ImunifyAV+ Anti-virus Monitoring Fortinet Hardware Firewall Halon outbound Email Spam Protection Acronis Backups Fortinet Hardware Firewall Nagios Service Monitoring LiteSpeed Web Server + LiteSpeed Cache CloudLinux & Kernelcare (AlmaLinux 8 servers only) Installatron (AlmaLinux 8 servers only) Additional cPanel Account Licences Fully Managed VPS Plans Fully Managed VPS's already include all the above addons however there are some differences: Complete Security Suite: Instead of ImunifyAV+ we use Monarx for Anti-virus.